Introduction to Containerization in SAP Commerce Cloud
Containerization is a technology used in software packaging, enabling developers to bundle an application and its dependencies into a standardized package for deployment. Containers operate in isolation from each other and the underlying host system, which contributes to their lightweight and portable characteristics. Consequently, they are well-suited for deploying applications in cloud environments, where multiple containers can efficiently utilize shared resources.
Benefits of Containerization
Containerization in SAP Commerce Cloud offers a range of benefits when setting up applications on a local machine:
- Environment Consistency: Containers encapsulate applications along with their dependencies, ensuring uniformity in the development environment across different machines and operating systems. By using container images with necessary components, developers can easily share and replicate development environments across teams.
- Dependency Management: Containers isolate dependencies within their own runtime environment, eliminating conflicts between different versions of libraries or dependencies. Developers can specify dependencies and configurations directly within a container image, minimizing dependency-related issues and setup complications.
- Resource Efficiency: Containers share the host machine’s operating system kernel, leading to more efficient resource utilization compared to traditional setups where each application consumes resources directly from the host. Multiple containers can run simultaneously on the same machine without significant overhead, optimizing resource usage.
- Isolation and Security: Containers provide a layer of isolation between applications, enhancing security by limiting the impact of any potential security breaches. Each container runs in its own isolated environment, preventing applications from interfering with each other or the host system. Additionally, container images can be scanned for vulnerabilities, and security patches can be applied to ensure a secure development environment.
- Portability: Container images are portable and can be deployed consistently across different environments, including local development machines, testing environments, and production servers. Developers can build and test applications in a containerized environment locally before deploying them to production, reducing the likelihood of environment-related issues.
Difference between traditional and container-based application setup in SAP Commerce Cloud
When comparing traditional setups with container-based setups on a local machine, several distinct differences emerge.
Environment Isolation:
- Traditional Setup: Applications typically install their dependencies directly onto the host operating system, which can lead to potential conflicts between versions of libraries or dependencies.
- Container-Based Setup: Applications and their dependencies are encapsulated within separate containers, each with its own runtime environment. This ensures isolation, allowing multiple versions of dependencies to coexist seamlessly on the same machine without conflicts.
Resource Utilization:
- Traditional Setup: Each application consumes system resources directly from the host machine, potentially leading to resource wastage, particularly when multiple applications require similar dependencies or libraries.
- Container-Based Setup: Containers share the host machine’s operating system kernel, ensuring efficient resource utilization. Multiple containers can run simultaneously on the same machine with minimal overhead, as they share resources like CPU, memory, and disk space.
Dependency Management:
- Traditional Setup: Managing dependencies is often complicated, as installing, updating, or removing dependencies can inadvertently affect other applications or system components.
- Container-Based Setup: Dependencies are packaged within the container, making dependency management easier and more predictable. Each container encapsulates its dependencies, ensuring that changes made to one container do not affect others.
Development Environment Consistency:
- Traditional Setup: Developers may often encounter issues related to differences between their local development environment and the production environment, leading to inconsistencies and potential bugs.
- Container-Based Setup: Containers provide a consistent runtime environment across different stages of the development lifecycle, ensuring that applications behave consistently regardless of the underlying host machine. Developers can use the same containerized environment locally as in production, reducing the likelihood of environment-related issues.
Deployment Flexibility:
- Traditional Setup: Deploying applications from a local development environment to production may often require manual configuration and setup, potentially leading to deployment errors or inconsistencies.
- Container-Based Setup: Container images can be easily deployed across different environments, including local machines, development servers, testing environments, and production servers, using container orchestration tools like Docker Compose or Kubernetes. This streamlines the deployment process and reduces the likelihood of deployment-related issues.
Isolation and Security:
- Traditional Setup: Applications run directly on the host operating system, potentially exposing the system to security vulnerabilities or risks if an application is compromised.
- Container-Based Setup: Containers enhance security by isolating applications, thereby limiting the impact of potential breaches. However, to ensure robust security, it is critical to secure container images and regularly update them to mitigate vulnerabilities.
In summary, container-based application setups in SAP Commerce Cloud offer several significant advantages over traditional setups on local machines. These include improved environment isolation, optimized resource utilization, simplified dependency management, consistent development environments, streamlined deployment flexibility, and enhanced security. These benefits make containerization an attractive option for local development workflows, particularly in modern software development environments.
Introduction to Containerization Tools in SAP Commerce Cloud
This section focuses on two primary containerization tools: Docker and Podman.
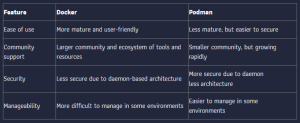
Docker and Podman are both containerization technologies that facilitate the packaging and execution of applications within isolated environments. They adhere to the Open Container Initiative (OCI) standards, ensuring compatibility between container images created with one tool to be used with the other.
- Docker: A widely established and adopted containerization tool with a strong community and extensive ecosystem. Docker uses a daemon-based architecture, which requires a continuously running daemon process to manage and create containers. While this architecture provides robust functionality, it can also lead to security concerns and management complexities in certain scenarios.
- Podman: A more recent entrant to containerization, Podman is recognized for its lightweight and secure approach. Unlike Docker, Podman operates as a daemonless system, which eliminates the need for a persistent daemon process. This design choice enhances security and simplifies management, particularly in specific environments.
Below is a table summarizing the key features of Docker and Podman:
Step-by-Step Guide to SAP Commerce Cloud Containerization Setup
Choosing the Containerization Platform and Installation
The choice of a containerization platform depends on your specific needs and requirements:
· Docker: Ideal if you prioritize a mature, user-friendly containerization technology with extensive community support, a robust ecosystem of tools and resources.
· Podman: A great choice if you need a lightweight, secure containerization technology that is easy to manage.
We will be using docker for this example
Installing Docker on Linux (Ubuntu)
sudo apt-get update
sudo apt-get install ca-certificates curl
sudo install -m 0755 -d /etc/apt/keyrings
sudo curl -fsSL https://download.docker.com/linux/ubuntu/gpg -o /etc/apt/keyrings/docker.asc
sudo chmod a+r /etc/apt/keyrings/docker.asc
echo “deb [arch=$(dpkg –print-architecture) signed-by=/etc/apt/keyrings/docker.asc] https://download.docker.com/linux/ubuntu $(. /etc/os-release && echo “$VERSION_CODENAME”) stable” | sudo tee /etc/apt/sources.list.d/docker.list > /dev/null
sudo apt-get update
Download the latest DEB package
wget https://desktop.docker.com/linux/main/amd64/149282/docker-desktop-4.30.0-amd64.deb
Install the package with apt as follows:
sudo apt-get update
sudo apt-get install ./docker-desktop-<version>-<arch>.deb
Installing Docker in Mac
Download the installer using the download buttons at the top of the page, or from the release notes(https://docs.docker.com/desktop/release-notes/).
Double-click Docker.dmg to open the installer, then drag the Docker icon to the Applications folder. By default, Docker Desktop is installed at /Applications/Docker.app.
Double-click Docker.app in the Applications folder to complete the Docker Installation.
Installing Docker in Windows
Download the installer using the download button at the top of the page, or from the release notes(https://docs.docker.com/desktop/release-notes).
Double-click Docker Desktop Installer.exe to run the installer. By default, Docker Desktop is installed at C:\Program Files\Docker\Docker.
When prompted, select WSL 2 or Hyper-V option on the Configuration page as per your choice of backend.
If your system only supports one of the two options, you will not be able to select which backend to use.
Follow the instructions on the installation wizard to authorize the installer and proceed with the installation.
Building & Running SAP Commerce Cloud and other required application service containers
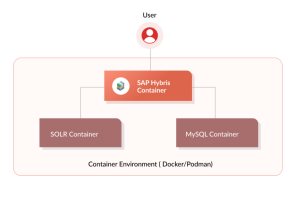
A GitLab repository has been created with all the necessary files required to build Hybris version 2205.12, along with SOLR version 8.11 and MySQL DB version 8.0. Below is our target setup.
Before doing this setup, make sure your system or docker-machine has enough resources. I would recommend at least 100GB disk space, 4 CPUs and 8GB RAM allocated to Docker.
Clone the GitLab repository
git clone https://gitlab.com/neocloudops-public/hybris_container_project.git
NB:
- Place your Hybris ZIP file (for ex: CXCOMM220500P_12-80006942.ZIP) inside `app-hybris/files` & `app-solr/files` directory.
- If you are building and setting up hybris locally on a MacOS silicon chip-based machine, make sure you uncomment 1 line in 2 files (docker-compose.yml & app-hybris/Dockerfile >>> just search for `macos`)
Build DB, SOLR & Hybris Images and run containers
cd hybris_container_project
docker compose up -d –build
Containers will get built and will start automatically. Verify the container logs to confirm the services are up & running properly.
If you check the app-db container logs, you should see a line saying:
[Server] /usr/sbin/mysqld: ready for connections
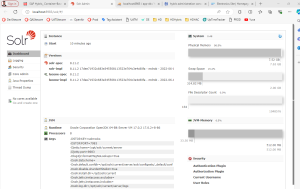
If you check the app-solr container logs, you should see a line saying:
INFO (main) [ ] o.e.j.s.Server Started
If you check the app-hybris container logs, you should see a line saying:
INFO: Server startup in **** ms
Now let’s restart the containers (Maybe you will get some errors in container startup in the above step, restart will fix those issues),
docker compose down && docker compose up –d –build
Once containers are up,
Open http://localhost:8983/solr/#/ for SOLR Admin.
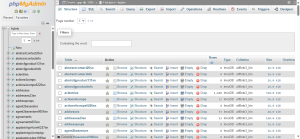
Open http://localhost:8985 for PHPMyAdmin. Give `host` as `app-db` & `username/password `as `hybris/hybris` to login.
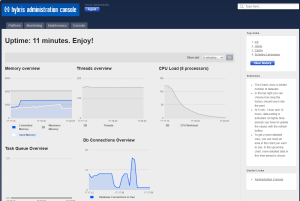
Open https://localhost:9002/ for Hybris HAC. Do a system Initialization with default settings. Once it is finished, you will be able to log in to HAC as an Admin user using `admin/admin` credentials.
Open the below URL for the default electronic store:
https://localhost:9002/yacceleratorstorefront/electronics/en/?site=electronics&clear=true
So, what is happening here is when you execute docker-compose up –build, it looks at the configuration in docker-composer.yml. In that file, it’s specified to build an image for the Solr app, Db app & Hybris app containers. To do this, it reads the instructions from the Dockerfile located inside the app-solr, app-db & app-hybris directories respectively. This file contains all the steps needed to create the image, like installing software or setting configurations. There’s also a tool called phpMyAdmin included, which helps manage the database easily.
Once the images are created based on the instructions in these Dockerfiles, they are saved. Then, using the settings from docker-compose.yml, Docker creates and starts containers using these saved images.
Conclusion
Containerization technology offers developers a streamlined approach to setting up processes, enabling reproducible environments and accelerating development cycles.
By understanding the differences between traditional and container-based setups, developers can appreciate the benefits of adopting containerization for local application development. Containerization isolates applications and their dependencies within lightweight, portable containers, ensuring consistency and efficiency across different environments. For seamless setup of applications like SAP Commerce Cloud, SOLR, and MySQL on a local machine, developers can follow tailored steps for each application’s requirements. This approach creates self-contained environments that include all necessary dependencies, configurations, and services, ensuring smooth operation of the application stack on a local machine.
In practice, setting up containers for SAP Commerce Cloud, SOLR, and MySQL involves:
· Creating Docker images for each application.
· Defining Docker Compose configurations to manage container orchestration.
· Ensuring proper networking and communication between containers.
With containerization, developers can seamlessly manage dependencies, scale applications, and replicate production environments locally, facilitating efficient development and testing workflows.
Ready to optimize your SAP Commerce Cloud setup? Contact PIT solutions for expert guidance on containerized development environments.


